Affiliate Links Notice: We have included affiliate links in this blog article. These links will help you purchase the product(s) you need (from our partner), which may enhance your overall benefits received, and/or experience. Should you click on the respective link(s) and make a purchase, we will receive a commission.
Note Briefly & Disclaimer
As is standard, you should ensure you have your Medical Doctor’s clearance before engaging in any exercise regimen.
*The content you engage with herein, is for general education purposes primarily. Whilst, professional care on our part towards ensuring the stretches, exercises & workouts (with supported content), shared herein, are “safe” for beginners, seniors and other special population segments has been implemented, 100% responsibility for your personal safety, rests on you. Consequently by executing the stretches , exercises & workouts you see herein, you are doing so on your own free will, and hence agree to hold us (O’Shane Bryant Fitness Limited), our team–management to interns; and partners free from any liability claims caused through injury or worse, whatsoever.
Contributed By: Oshane Bryant & Kimberlee Morgan.

Click Here to Learn More
🔍 Unlocking Hip Power: Abduction, Flexion & Extension
The hips are a powerhouse of movement—central to walking, running, lifting, and everyday function. In this video, the three essential hip movements are broken down: abduction, flexion, and extension. Each movement targets different muscle groups and contributes to improved stability, mobility, and strength. Let’s explore how to do each one and why they matter.
🦵 Hip Abduction
What it is: Moving your leg out to the side, away from your body’s centerline.
How to do it:
Stand next to a wall or sturdy support. Keeping your torso upright, lift one leg straight out to the side—maintain a forward-pointing toe and resist leaning toward the opposite hip.
Muscles worked:
-
Gluteus Medius & Minimus – key stabilizers of the pelvis
-
Tensor Fasciae Latae (TFL) – assists with the movement
Why it matters: Strengthening hip abductors boosts posture, supports low-back alignment, and enhances balance—especially helpful when walking or navigating stairs. Stable hips reduce the risk of lower back pain and compensatory injuries.
🦵 Hip Flexion
What it is: Lifting your knee up and forward, toward your chest.
How to do it:
Stand tall with hands on your hips or hold a support. Bring one knee up in front of you while keeping your core engaged and your spine neutral. Control the motion—you can do this standing or seated, depending on your balance and mobility.
Muscles worked:
-
Iliopsoas – deep hip flexor
-
Rectus Femoris – part of the quadriceps
-
Sartorius – assists hip flexion and rotation
Why it matters: Hip flexion is fundamental for walking, running, and climbing. Strengthening hip flexors improves stride power, core stabilization, and overall functional movement.
🦵 Hip Extension
What it is: Moving your leg backward, behind your body.
How to do it:
Stand upright with a stable support. Keep your glutes engaged and your spine stable. Slowly extend one leg behind you—either straight or with a slight knee bend—without arching your back or leaning forward.
Muscles worked:
-
Gluteus Maximus – the powerhouse behind hip extension
-
Hamstrings – assist in extending the hip
Why it matters: Hip extension drives powerful movements like sprinting, jumping, lifting, and climbing. Strength and control here support the entire posterior chain and help prevent lower-back and hamstring issues
✅ Suggested Application
Integrate these into your routine easily:
-
Warm-up: Alternate hip flexion and abduction to prepare for more intense movements.
-
Strengthening drills: Focus on hip extension for posterior-chain power.
-
Mobility flow: Move through all three in a controlled circuit to enhance hip range and control.
When your hips work right, the rest of your body follows suit. Unlock your movement with these three simple yet impactful exercises—and give your posture, power, and mobility the support they deserve.
🚶♀️🏃♂️ Brisk Walk • Jog • Sprint — When & Why Each Pace Matters
The video below highlights a simple yet effective cardio progression: brisk walk, jog, and sprint. While similar in terms of movement patterns and muscle groups, each pace serves a distinct purpose depending on intensity level and goals. The key takeaway? All three have their place—and all are effective if used correctly.
⏱️ When to Use Each Pace & Their Benefits
1. Brisk Walk
-
Ideal For: Beginners, those recovering from injury, or people looking for low-impact cardio.
-
Benefits:
-
Elevates heart rate gently and improves circulation.
-
Easier on joints while still burning calories.
-
2. Jog
-
Ideal For: Building stamina, steady-state cardio, or combining with walk-paced recovery.
-
Benefits:
-
Trains aerobic endurance—keeping heart rate elevated.
-
Offers moderate calorie burn with manageable impact on legs.
-
A slow jog can still burn more calories than a brisk walk at slower speeds.
-
3. Sprint
-
Ideal For: Boosting power, speed work, high-intensity intervals in short bursts.
-
Benefits:
-
Maximizes calorie burn in minimal time.
-
Improves explosive strength and conditioning.
-
Activates fast-twitch muscle fibers and metabolic adaptations.
-
🛠️ How to Structure a Session
-
Warm-Up (Brisk Walk):
Begin with 5–10 minutes of brisk walking to gradually raise your heart rate and prepare muscles. -
Jog Segments:
Maintain a steady, conversational jog—slightly faster than your brisk walk—for 1–5 minutes depending on your level. -
Sprint Intervals (Optional):
Include short sprints (15–30 seconds) if you’re training for power or HIIT. Always follow with recovery jog or walk. -
Recovery Options:
You can recover using a slow jog or walk. Jogging keeps heart rate elevated for endurance, while walking allows more full recovery when speed/intensity is the goal. -
Cool-Down (Brisk Walk):
Finish with 5–10 minutes of walking to gently bring your heart rate down and aid recovery.
🎯 2 Key Benefits of the Walk → Jog → Sprint Approach
-
Scalable Intensity:
You can adjust each pace to match your fitness level—from gentle walks to fast sprints—making the workout accessible to beginners and advanced movers alike. -
Total Fitness Impact:
-
Brisk walk for joint-friendly calorie burn and recovery.
-
Jog for aerobic base building and endurance.
-
Sprints for anaerobic conditioning, power, and metabolism boost.
-
Collectively, this combo trains both the heart and muscles across different energy systems—without overdoing any single component.
Day 27 & 28: Seated Hold & Kneeling Bird Dog Exercises
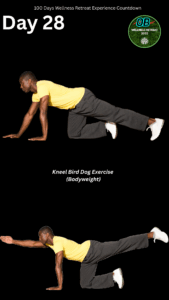
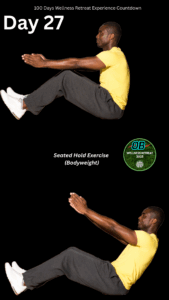
Primary Muscles Targeted: Core (abdominals, hip flexors, back extensors).
Key Benefit of Seated Hold & Kneeling Bird Dog
Strengthens your core.
Best Times to Do the Seated Hold & Kneel Bird Dog
At the Start/End of a Core Workout (main segment)
Use it to activate your core and ease into more challenging movements.
Day 26: Kneel Plank
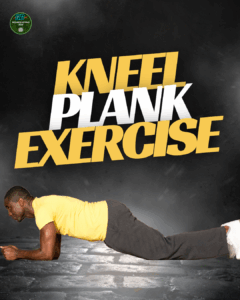
Primary Muscles Targeted
Core (Abdominals-Superficial & deep; hip Flexors)
⭐ 3 Key Benefits of the Kneeling Plank
-
Gentle on the Back, Strong on the Core
Ideal for beginners or anyone with back pain—this variation takes pressure off your spine while still engaging your abdominals. -
Builds a Strong Foundation
Helps improve posture, stability, and balance—essential for daily movement and injury prevention. - Can be Executed by Seniors relatively easily, compared to the the standard forearm plank.
⏰ Best Times to Do the Kneeling Plank
-
At the Start/End of a Core Workout (main segment)
Use it to activate your core and ease into more challenging movements.
✅ How to Do a Kneeling Plank
-
Start Position
Get down on all fours. Then, lower your forearms to the floor so your elbows are directly under your shoulders. -
Knees Down, Core Tight
Extend your body so you’re resting on your knees and forearms. Your body should form a straight line from your head to your knees (natural curve of spine). -
Hold the Position
Engage your core muscles (like you’re zipping up tight jeans). Keep your neck neutral and don’t let your hips drop or rise. -
Breathe and Focus
Breathe steadily. Hold for 20–30 seconds to start, and build up to 60 seconds as you get stronger. -
Repeat
Do 2–3 rounds, resting 30 seconds between each set.
Day 25: Wall Squat
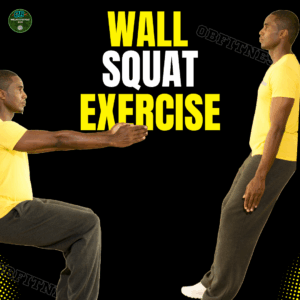
Primary Muscles Targeted
Quadriceps, Glutes, Hamstrings
Secondary Muscles Engaged
Calves, Core
It’s time to feel the burn and build strength with one of the most deceptively simple lower-body workouts around — the Wall Squat. No fancy equipment, no excuses — just you, the wall, and your determination!
🌟 Key Benefits of Wall Squats:
✅ Builds strength & endurance in legs & glutes isometrically
✅ Improves posture and core stability
✅ Great for joint-friendly musculoskeletal condtitioning.
✅ Requires no equipment
⏰ Best Time to Do This Exercise:
-
During your morning workout for a strong start to the day
-
As part of your lower body day
-
Mid-day desk break to re-engage your body & mind for part 2 of your day.
-
Pre/post cardio to warm up or cool down leg muscles
📝 How to Perform a Wall Squat:
-
Start Position:
Stand with your back flat against a wall. Feet should be slightly wider than shoulder-width apart and about 2 feet away from the wall. -
Bend Your Knees. Lower Down:
Slide your back down the wall until your thighs are parallel to the floor — knees at a 90° angle, or you’re at your tolerable range. Keep your knees stacked behind your toes. -
Hold That Position
Engage your core, keep your back flat against the wall, and hold the position for 20–60 seconds (or more if you’re feeling bold 😏). -
Breathe:
Inhale through your nose, exhale through your mouth. Stay calm and focused. -
Rise Up:
Slowly slide back up the wall and rest for 30 seconds. Repeat 3–4 rounds.
Day 24: Brisk Walk
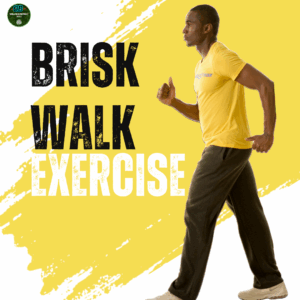
Primary Muscles Targeted
Quadriceps, Hamstrings, Glutes (Gluteus Maximus), Calves (Gastrocnemius & Soleus), Hip Flexors
Secondary Muscles Engaged
Core, Lower Back
Don’t underestimate the power of a good walk. Brisk walking is one of the most accessible yet effective forms of cardio that boosts your mood, burns calories, and strengthens your heart — all while being gentle on your joints.
Key Benefits of Brisk Walking:
-
Boosts cardiovascular health
-
Aids in fat loss and tones the lower body
-
Improves mood and reduces stress
-
Increases energy levels
-
Supports healthy blood pressure and blood sugar levels
🕘 Best Time to Walk:
-
Morning: Kickstart your metabolism and set the tone for a productive day.
-
Evening: Great for de-stressing and unwinding after work.
How to Do It Right:
-
Posture is everything – Keep your head up, shoulders relaxed, and core engaged.
-
Pick up the pace – Your walk should feel intentional, with slightly elevated breathing but not breathlessness.
-
Swing those arms – Let your arms move naturally to help maintain momentum and balance.
-
Step with purpose – Roll your foot from heel to toe for maximum benefit.
-
Duration: Aim for 20–0 minutes, or break it into two 15-minute walks, if your schedule is tight.
Day 23: Incline Push Up
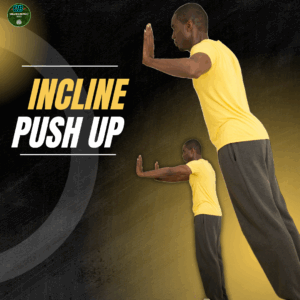
Primary Muscles Targeted
Pectorals, Triceps, Anterior Deltoids
Secondary Muscles Engaged
Core, Serratus Anterior, Rotator cuff, Neck Stabilizers
Incline push-ups are a great beginner-friendly variation of the standard/military push-up. They’re easier on the wrists and shoulders but still highly effective for building upper body strength & endurance. All you need is a sturdy surface—like a bench, wall, chair, or step.
⭐ 2 Key Benefits of Incline Push-Ups
-
Upper Body Strength Building Without Full-Body Weight
Perfect for beginners or anyone easing into push-ups—still works the chest, arms, and shoulders but with less pressure on joints. -
Improves Core Control and Posture
Keeping your body in a straight line strengthens your core and teaches good movement habits.
⏰ Best Times to Do Incline Push-Ups
-
During Warm-Up Routines
A great way to gently activate your upper body before more intense workouts. -
As Part of a Strength or Circuit Workout
Use them in your main workout for reps or in a circuit with other bodyweight moves.
✅ How to Do Incline Push-Ups
-
Start Position
Place your hands shoulder-width apart on a sturdy elevated surface (like a wall or table/bench). Walk your feet back so your body forms a straight line from head to heels. -
Tighten Your Core
Engage your abs and glutes to keep your body firm and straight. Don’t let your hips sag! -
Lower Your Body
Bend your elbows and lower your chest toward the surface slowly. Keep your elbows at a slight angle from your body—not flared out. -
Push Back Up
Press through your palms to straighten your arms and return to the start position. -
Repeat
Do 10–15 reps in a slow & controlled manner. Complete 2–3 sets.
Day 21 & 22: YouTube Live Stream: 4 D’s of Self Defense (Creation & Broadcasting)
In this episode we expose you to the 4 D’s of self defense. If you actively or passively practice self-defense, you will be familiar with awareness (detect). We will expose you to awareness in greater depth; applicable body movements & postures, in addition to the others. At the end of your engagement with this live you should:
1. Have a stronger understanding of the 4 D’s of self defense.
2. Have a higher capacity of defending yourself in today’s world.
Day 20: Reverse Fly Exercise (bodyweight)

Primary Muscles Targeted
Trapezius, Rhomboids, Posterior & Medial Deltoids, Rotator Cuff
Secondary Muscles Engaged
Neck Extensors, Erector Spinae
——————————————————————
The reverse fly exercise is great for building strength & strength endurance in you scalupar retractors, shoulder external rotators & abductors to name a few. If you experience pain in between your shoulder blades that’s attributed to weakness of your scapular retractors, this exercise is a good.
How to Do The Reverse Fly Exercise
1. Stand with your feet shoulder width apart.
2. Lower your chest to the floor and hold it in place, sub-parralel to parallel. Ensure your back is flat-push your chest out like a chicken, to get a table-top back, as you see in the photo.
3. While keeping your body still, extend both your arms toward the floor.
4. In a slow & controlled manner, raise both your arms to the side, like a bird flapping its wings.
5. Hold your arms raised at the highest level, for about 2 seconds.
6. In a slow & controlled manner, lower your arms back to their start point.
7. Do 10-15 reps. Execute 2-3 sets.
Day 19: Standing Leg Raise to Side Exercise
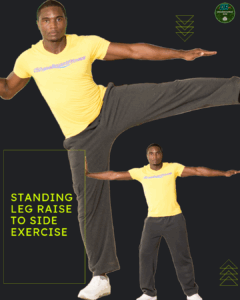
Primary Muscles Targeted:
Gluteus Medius, Tensor Fasciae Latae (TFL), Gluteus Minimus
Secondary Muscles Engaged:
Gluteus Maximus, Obliques, Quadriceps, Hip Flexors, Adductors (Inner Thighs), Calves and foot
——————————————————————
The Standing Leg Raise to the Side is a simple yet effective exercise that activates & strengthens your outer hips (hip abductors) whilst engaging your core—no equipment required!
✅ 2 Key Benefits of the Standing Leg Raise to Side Exercise
-
Improves Hip Stability & Balance
This exercise strengthens the muscles around your hips and pelvis, which in turn enhances your balance and coordination—crucial for everyday activities and injury prevention. -
Tones Outer Thighs & Glutes
Regularly doing this movement helps sculpt the outer thighs and lift the glutes, making it a great choice for building lower body strength and definition without weights.
⏰ Best Times to Do This Exercise
-
As a Warm-Up Before Lower Body Workouts
Activates the glutes and hips, prepping your muscles for squats, lunges, or running. -
During a Midday Movement Break
Perfect for breaking up long periods of sitting—helps reactivate dormant muscles and improve circulation.
✅ How to Do the Standing Side Leg Raise
-
Start Position
Stand tall with feet shoulder-width apart. Stretch your arms out to the sides, or against the wall for balance support. -
Tighten Your Core
Pull your navel to your spine. This will keep your tummy muscles tight. and your body straight—no leaning! -
Lift Your Leg
Raise one leg out to the side as high as you can, keeping it straight and your toes pointing forward. -
Hold It
Pause at the top for 1–2 seconds. Squeeze your side glutes. -
Lower Slowly
Bring your leg back down with control. Don’t let it drop. -
Repeat
Do 10–15 reps per leg. Execute for 2–3 sets.
Day 18: Seated Shoulder Press Exercise (bodyweight)
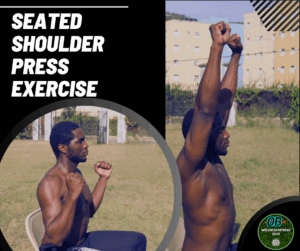
Primary Muscles Targeted:
Deltoids, Triceps
Secondary Muscles Engaged:
Upper back, Core, Chest, Intercostals, Serratus muscles
Your shoulders are your silent strength — they help you push, pull, carry, and hold connect your arms to your torso. Today’s movement (seated shoulder press) takes your upper body pushing, strength & endurance up a notch. This classic upper-body exercise tones your arms, powers up your shoulders, and helps build you a solid upper body foundation for everyday movement. It’s time to sit tall, press proud, and feel the fire in your upper body.
Let’s gooo! 🪑🔥💪🏽
✅ Why This Exercise is Great:
-
Strengthens Your Arms and Shoulders:
Helps you lift things easier and carry bags without strain. -
Improves Posture and Balance:
Great for anyone who sits at a desk or wants to stand taller with confidence.
🕒 Best Times to Do This:
-
During Upper Body or Full Body Workouts
Works well with arm day or total strength/strength-endurance sessions. -
In a Seated Routine
Awesome for people who may be working around lower-body injuries or need low-impact options.
How to Do the Seated Shoulder Press (bodyweight):
-
Sit up straight on a sturdy chair or bench. Keep your feet flat, your back tall & your navel pulled to your spine.
-
Push your hands straight up above your head in a smooth motion.
-
Extend your arms fully, or you your greatest range of motion allowed; but avoid locking your elbows.
-
Slowly lower your arms back down to your shoulders.
-
Execute for 12–20 reps for 2–3 sets.
🔑Pro Tip: If you’re new to this, or experience shoulder pain, execute this exercise with only your bodyweight. Once you feel fatigue, if you don’t have a spotter, stop. Additionally, focus on moving with control.
Day 17: Standing Leg Curl Balance
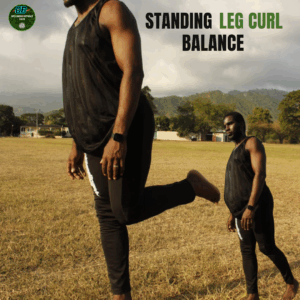
Primary Muscles Targeted:
Hamstrings, Glutes,
Secondary Muscles Engaged:
Calves, Core muscles, Quadriceps
Balance isn’t just about staying upright — it’s about connecting your body with your mind and your movement with your purpose. Whether you’re trying to improve coordination, tone your hamstrings, or just keep your body guessing — this move is a must in your wellness toolkit. You’ll feel the burn, find your center, and build control from the ground up. Let’s curl, hold, and own it 💪🏽🦶🏽
✅ Top Benefits:
-
Strengthens Hamstrings & Improves Balance:
Great for injury prevention and overall lower body functionality, especially in athletes and older adults. -
Boosts Proprioception & Core Engagement:
Teaches your body to “feel” its positioning, improving coordination, stability, and overall posture.
🕒 Best Times to Do This Exercise:
-
During Warm-Ups or Mobility Sessions
Great for firing up the posterior chain before leg day or a cardio workout. -
As Part of Your Balance or Rehab Routine
Especially useful for seniors, athletes recovering from knee/ankle injuries, or anyone wanting better control.
How to Do the Standing Leg Curl Balance:
-
Stand tall with feet hip-width apart, arms by your side or out for balance.
-
Shift your weight onto your left foot and bend your right knee, curling your heel up toward your glutes.
-
Squeeze your hamstring at the top of the curl and hold the position for 3–5 seconds.
-
Engage your core and keep your upper body upright and steady.
-
Slowly lower your right foot back to the ground.
-
Repeat for 10–12 reps, then switch legs
Day 16: Wrist Extension Stretch
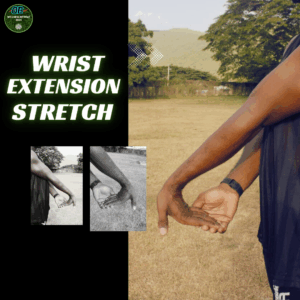
Primary Muscle Groups Targeted:
Wrist Extensors, Forearm
Our wrists are always working — but how often do we give them the care they deserve? Today’s stretch is for the unsung heroes of the upper limbs. Whether you’re an office warrior, athlete, or just someone glued to a device, this Wrist Extension Stretch is going to give you instant release and long-term relief. Let’s stretch smarter, not harder.
✅ Top Benefits:
-
Improves Wrist Flexibility & Mobility:
Especially helpful for people who spend long hours on keyboards, lifting weights, or playing racquet sports. -
Reduces Wrist & Forearm Tension:
Helps you prevent & recover (if applicable), from overuse injuries like carpal tunnel syndrome or tendonitis of the wrist extensors tendons.
🕒 Best Times to Do This Stretch:
-
Before or After Upper Body Workouts
Great to prep the wrists for strength training or to relieve post-workout tightness. -
During Desk Breaks or After Long Screen Time
Especially helpful if your hands are in a fixed position for hours — like typing or scrolling.
How to Do the Wrist Extension Stretch:
-
Extend one arm straight out in front of you with your palm facing down and fingers pointing forward.
-
Using your opposite hand, gently grab the fingers of the extended arm.
-
Slowly pull the fingers downward and back toward your body, keeping the elbow straight.
-
You should feel a stretch along the top of your forearm and wrist.
-
Hold the position for 2–10 seconds, breathing steadily.
-
Switch arms and repeat.
Day 14: Seated Ankle (Plantarflexion, Inversion) & Lower Leg Stretch
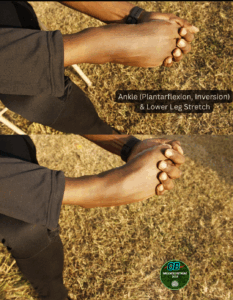
Primary Musculoskeletal Areas Targeted:
Ankle Plantarflexors; Inversion Muscles & Tendons. Distal Ankle Ligaments. Toes Dorsiflexors Muscles & Tendons.
Secondary Muscle Groups Engaged:
Toes Extensors. Foot Arch.
Standing, Walking, Running and Jumping movements, yields compression of soft tissue structures of your ankle & foot. Inversion ankle sprain/fracture and your immobilization (typically prescribed treatment & healing feature post injury, and/or surgery), can yield atrophy of your lower leg muscles, and/or reduced range of motion of your ankle (plantarflexion, inversion).
——————————————————————
Benefits of Ankle & Lower Leg Stretch (Plantarflexion & Inversion)
- Promote improved circulation of blood and lymph from ankle(s) to rest of body.
- Can ease the incidence of ankle edema after prolonged sitting or standing at work.
- Can support ankle rehab efforts post ankle inversion sprain.
Applicable Times to Execute The Ankle & Lower Leg Stretch (Plantarflexion & Inversion)
- After a long day at work.
- When you experience stiffness or reduced ankle & foot mobility.
- Before you engage in an ankle & foot-involved, exercise session.
How to Execute The Ankle & Lower Leg Stretch (Plantarflexion & Inversion)
- Whilst sitting on a chair, place your right ankle, on the knee of the non-stetching ankle (left).
- Using the fingers of your left hand, gently pull all of your toes, down to the floor (plantarflexion), and towards your left armpit (inversion).
- Hold the stretch for 2-10 seconds.
- Repeat on other ankle.
Day 13: Hand Behind Back, Shoulder Stretch
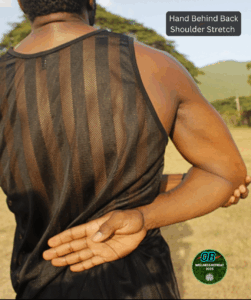
Primary Muscle Groups Targeted:
Rotator Cuff
Secondary Muscle Groups Engaged:
Trapezius, Rhomboids
—————————————————————–If you do shoulder strengthening exercises such as the: reverse fly, external & internal rotation (with resistance band), then the hand behind back, shoulder stretch will come in handy. Likewise, if you experienced a shoulder injury, which resulted in your reduced mobility, this stretch will come in handy. Additionally, if you experience periodic numbness and/or tingling in your shoulder – fingers, this stretch can yield relief.
Benefits of Hand Behind Back, Shoulder Stretch:
- Stretches the rotator cuff muscles, which can support rotator cuff rehab.
- Improves/support optimum mobility of shoulder & scapular-thoracic joints.
Applicable Times to Execute The Hand Behind Back, Shoulder Stretch
- When experiencing tightness around the area of the shoulder blade, and/or underneath the collar bone.
- Before engaging in racquet, throwing & combat sports.
- Post engagement in racquet, throwing & combat sports.
- Periodically during your work day, especially if your job includes: lifting heavy loads, typing & driving.
How to Execute Hand Behind Back, Shoulder Stretch
- The hand you intend to stretch, place on the small of your lower back.
- With the fingers of your support hand, gently pull on the elbow (as shown in photo), of the arm being stretched.
- Hold the pull for 2-10 seconds, do stretch on both arms/shoulders.
(adsbygoogle = window.adsbygoogle || []).push({});
Day 12: Upper Back & Neck Stretch
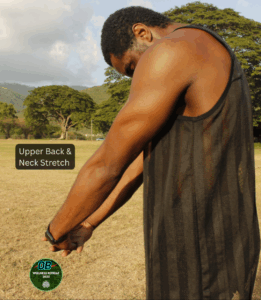
Primary Muscle Groups Targeted:
Upper Trapezius
Secondary Muscle Groups Engaged:
Cervical Spine muscles (neck), Upper Thoracic Spine (upper part of the mid-back)
We tend to carry stress on our shoulders. We bury tension in our necks. And before we know it, we’re walking around tight, hunched, and sore — all without even realizing it.
But not today. Today is about releasing what you’ve been holding, by executing this upper back & neck Stretch.
✅ Top Benefits:
-
Releases Tension from the Neck and Upper Back:
Ideal for easing soreness from poor posture, desk work, or phone use. -
Improves Posture & Mobility:
Encourages proper head and shoulder alignment and helps keep your cervical & thoracic spine moving freely.
🕒 Best Times to Do This Stretch:
-
First Thing in the Morning or Before Bed
Great way to reset and realign your spine at the beginning or end of the day. -
After Workouts or Screen Time
Especially helpful after upper-body workouts or long periods at a desk.
How to Do the Upper Back & Neck Stretch
-
Stand tall with your feet shoulder-width apart for stability.
-
Extend both arms forward and clasp your hands together, palms facing inward or slightly downward.
-
Drop your head forward, gently tucking your chin toward your chest.
-
Simultaneously, push your hands forward, creating a rounding motion in the upper back.
-
You should feel a stretch from the back of your neck down through your upper shoulder blades (primarily in between).
-
Hold this stretch for 2–10 seconds, breathing deeply. Repeat as needed.
Day 11: Standing Single Leg Balance (Sagittal Plane)
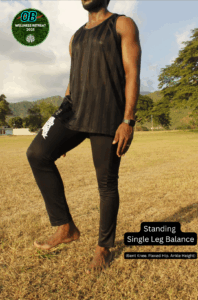
Primary Muscle Groups Targeted:
Foot, Ankle, Calf, Hip Flexors
Secondary Muscle Groups Engaged:
Core (Lower Back, Abdominals) Hamstrings.
It may look simple, but don’t be fooled — this exercise wakes up the entire lower body, challenges your core, and strengthens your mind-body connection. From seniors to athletes, this one’s for everyone who wants to stay stable, strong, and standing tall. Let’s get into it 👣🔥
✅ Top Benefits:
-
Improves Balance & Stability:
Crucial for injury prevention, daily movements, and overall coordination. -
Reduces Risk of Slips & Falls in Seniors:
Excellent for older adults to maintain confidence and independence with movement. -
Assists with Ankle Injury Rehab:
Strengthens the small stabilizing muscles around the ankle joint, aiding recovery and injury prevention.
🕒 Best Times to Do This Exercise:
-
During a Warm-Up or Cool-Down
Prepares the nervous system for movement or resets the body after a session. -
Mid-Workday or During Home Workouts
No equipment needed — perfect for breaks or daily movement goals.
(adsbygoogle = window.adsbygoogle || []).push({});
How to Perform the Standing Single Leg Balance:
-
Stand tall with feet hip-width apart and arms relaxed at your sides.
-
Shift your weight onto your right foot and slowly lift your left foot off the ground to ankle height (standing leg), bending the knee slightly.
-
Engage your core, keep your hips level, and avoid leaning to one side.
-
Hold this position for 20–30 seconds, keeping your gaze forward.
-
Lower your leg and repeat on the opposite side.
For an extra challenge: try closing your eyes or standing on a soft surface like a folded towel.
🔑 Tip: If you’re just starting out, use a wall or chair for support until your balance improves.
Day 10: Fingers & Palm Stretch

Primary Muscles Targeted:
Finger flexors and Palm muscles
Secondary Muscles Engaged:
Forearm muscles and Wrist stabilizers
Typing, texting, gripping, swiping — our hands do so much every single day. And if you’re lifting weights, playing sports, or even just living that boss-life at your desk, your fingers and palms are putting in work.
Let’s show your fingers some gratitude — one stretch at a time! 🙌🏽💅🏽
✅ Top Benefits:
- Releases Tension from Overuse:
Reduces stiffness from typing, texting, lifting, or gripping objects throughout the day. - Improves Grip Strength & Flexibility:
Keeps hands strong and flexible — especially helpful for athletes, musicians, or anyone working with their hands. - Can reduce nerve-related issues like carpal tunnel syndrome.
🕒 Best Times to Do This Stretch:
- Mid-Day Reset or Screen Break
Ideal if you’re typing or scrolling for long periods — your hands will thank you. - Pre or Post-Workout
Especially before or after lifting weights, playing a sport, yoga, or any activity that involves gripping or holding.
How to Do the Fingers & Palm Stretch:
- Extend one arm straight out in front of you, palm facing out.
- Using your opposite hand, gently wrap your hands around your folded fingers.
- Slowly and gently pull the fingers backward toward your body until you feel a light stretch.
- Hold each finger in the position for 5–10 seconds, then release.
- Repeat on each hand.
Don’t overdo it — just enough to feel a stretch.
Day 9: Neck Flexors Stretch
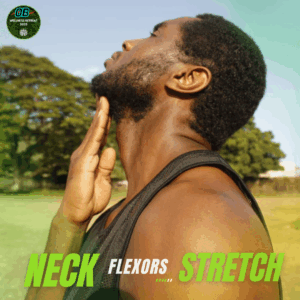
Primary Muscle Groups Stretched
Neck Flexors
You ever catch yourself hunched over your phone or laptop, only to realize your neck feels like it’s carrying the weight of the world? Yep — we’ve all been there. The Neck Flexors Stretch is the self-care move your body’s been begging for. It’s subtle, effective, and a total game-changer for releasing neck tension.
A few seconds of this stretch?
Instant relief.
Let’s give your neck the love it’s earned! 💖
✅ Top Benefits:
- Reduces Neck and Chest Tension:
Great for combatting tech neck and improving comfort after long hours at a desk or screen. - Improves Postural Alignment:
Retrain those deep neck muscles to keep your head aligned and your posture on point.
🕒 Best Times to Do This Stretch:
-
Mid-Workday or Post-Desk Sessions
Ideal for breaking up long periods of sitting and screen time. -
Pre or Post-Workout Cool Down
Especially useful after upper body training or any activity that strains the neck.
How to Do The Neck Flexors Stretch
- look up to the ceiling/sky.
- place about three fingers of one hand, underneath your chin as in the image above.
- with gentle & even pressure, push your chin up farther to your farthest point.
- Hold this position for approximately 2-10 seconds.
Day 8: Seated Ankle/Foot Stretch (Dorsiflexion)
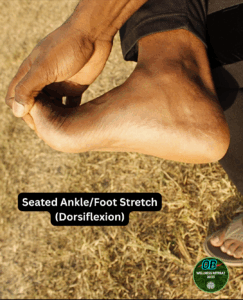
Primary Muscle Groups Stretched
Ankle Plantar flexors (Soleus), Toe Flexors (muscles & tendons), Achilles Tendon.
Secondary Muscle Groups Stretched
Significance & Benefits of the Seated Ankle/Foot Stretch (Dorsiflexion)
Sitting (prolonged periods) Standing (prolonged periods), walking, running & dancing in heels, shoes and sneakers (multiple exposures weekly), are examples of physical activities + footwear, that overtime, with minimal ankle dorsiflexion mobility work, and associated muscles and ligaments stretching, will likely result in musculoskeletal & functional issues, such as:
- Inflamed Achilles Tendon.
- Inflamed Plantar Fascia.
- Swollen Ankles.
Executing ankle stretches, such as the seated ankle stretch (dorsiflexion), intermittently throughout your day, is a sure way to assist your feet & ankles regain, attain & maintain, good/better health and/or function.
How to Do The Seated Ankle Stretch (Dorsiflexion)
- Sit on your chair. The ankle you intend to stretch, place it on top of the knee, of your non-stetching leg.
- Using the hand of the same foot/ankle you intend to stretch, place the fingers on the ball of your foot bottom, and simultaneously place the palm-heel on the bottom of you 4 biggest toes.
- With gentle and increasing force ,pull on the bottom of your toes, and ball of foot.
- Hold the pull for 2-10 seconds.
Day 7: Standing/Seated Medial Deltoid Stretch
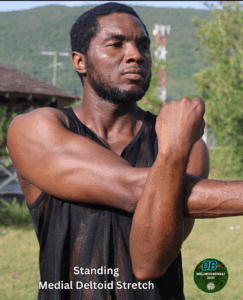
Primary Muscle Groups Stretched
Medial Deltoid
Secondary Muscle Groups Stretched
Rotator Cuff, Scapular Stabilizers
Significance & Benefits of the Medial Deltoid Stretch
Mixing (Cement, Cake Batter, Soup Pot); Driving; House/Office/Public Bathroom Cleaning; Racquet Sports-Tennis, Badminton, Cricket…
All of these activities & others will stress your medial Deltoids, and underlying rotator cuffs muscles that support shoulder abduction & external rotation. By executing this stretch-post warm up & post-workout; and periodically through your work day, you can mitigate against your shoulder deterioration by promoting blood flow and supporting your shoulder joint(s) recovery as examples.
How to Do The Standing/Seated Overhead Medial Deltoid Stretch
- Standing/sitting upright, and your hand positioned for a handshake, raise the hand you intend to stretch, straight in front of you, shoulder height.
- Move your raised arm towards the opposite shoulder.
- With your non-raised arm (forearm & bicep), hook the elbow of your straight arm bringing your outstretched arm closer to your opposite shoulder.
Day 6: Standing/Seated Triceps Stretch
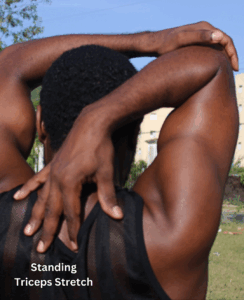
Primary Muscle Groups Stretched
Triceps
Secondary Muscle Groups Stretched
Rotator Cuff, Scapular Stabilizers
If your daily activity includes you tailoring, ironing, cooking, typing & pushing (loaded cargo in the shipping industry for example), then your triceps are heavily involved. Including this overhead triceps stretch, gives you the most bang for your buck, by stretching all members of the triceps group at once.
Benefits of this Stretch
*Promote regained arm function, in the event of stiffing/soreness in your elbow/back of arm, after a day of work .
* Aids with Scapular (shoulder blade) attaining/maintaining it’s full range of motion (upward rotation).
When You Should Do This Standing Chest Stretch
-After warm up (workout).
-When you experience soreness/stiffness in the back of your arm(s), and/or shoulder blade.
How to Do The Standing/Seated Overhead Triceps Stretch
- Standing/sitting upright, raise the hand you intend to stretch, straight towards the ceiling.
- Bend your raised arm at the elbow, to allow your hand to touch the back of your neck, or top of your head.
- With your non-raised arm, also raise it over head, touching, then pulling, the bent elbow of the hand, touching the back of your neck/top of your head.
Day 5: Seated Hip Stretch
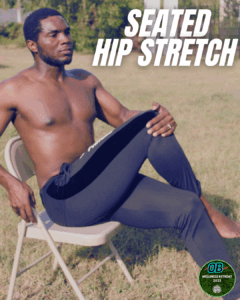
Primary Muscle Groups Stretched
Gluteal and Hip Abductors
Secondary Muscle Groups Stretched
Whether you’re grinding at your desk, conquering the court, or just trying to make it through the week without your hips yelling at you — this one’s for you!
The Seated Hip Stretch is your go-to move to unlock tight hips, correct your hips misalignment, and give your lower body the freedom it deserves. Trust us… your glutes, hips and back will be sending thank-you notes. 💌
🌟2 Benefits of Seated Hip Stretch:
-
Relieves Lower Back and Hip Tension:
Say goodbye to tight hips and lower back aches — especially after sitting long or training hard. -
Improves Hip Mobility & Posture:
A few seconds of this stretch daily, keeps you moving freely and standing tall.
🕒2 Best Times to Do This Stretch:
-
After Long Hours of Sitting
Perfect for breaking up your work day or post-drive recharge. -
Post-Workout Cool Down
Especially helpful after lower-body training or anything that fires up those glutes & hip.
✅How to Do the Seated Hip Stretch:
-
Sit upright on a sturdy chair or bench with both feet flat on the floor.
-
Cross your right ankle over your left thigh, forming a figure “4”.
-
Gently pull your right knee with your left hand towards your chest while keeping your back straight.
-
Keep your chest upright and back straight to deepen the stretch.
-
Hold for 5-10 seconds, then switch sides.
Day 4: Standing Side Bends Stretch
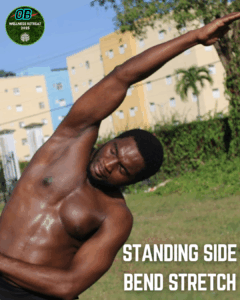
Primary Muscle Groups Stretched
Obliques and Quadratus Lumborum
Secondary Muscle Groups Stretched
Latissimus Dorsi, Intercostals, Serratus Anterior & Hips and Shoulders
The Stretch Your Sides Have Been Craving
(adsbygoogle = window.adsbygoogle || []).push({});
We stretch forward. We stretch back. But when was the last time you stretched sideways?
In a world that often moves in straight lines, Standing Side Bends Stretch remind your body that it’s designed to flow in all directions.
Whether you’re seated at a desk all day or lifting weights in the gym, the muscles along your torso — especially your obliques and intercostals — can get tight and neglected. This stretch is a simple but powerful way to bring length, release, and alignment back into your body.
🌟 2 Benefits of Standing Side Bends
1. Improves Spinal Flexibility and Mobility
Your spine needs to move in all directions — not just forward and back. This stretch helps maintain a healthy range of motion through the lateral plane, reducing stiffness and improving fluidity in movement.
2. Enhances Core Awareness and Posture
By targeting the obliques and rib area, this stretch gently activates your core, helping you stand taller and engage your trunk muscles more effectively throughout the day.
⏱️ 2 Best Times to Do Standing Side Bends
1. First Thing in the Morning
Before you dive into the day, open up your ribcage and spine with this energizing stretch to wake up your torso and improve breathing.
2. After Long Periods of Sitting or Driving
Counteract that hunched-forward feeling by lengthening the sides and decompressing the spine — a lifesaver after hours at a desk or in traffic.
✅ How To Do It:
-
Stand tall with your feet shoulder-width apart and arms relaxed at your sides.
-
Raise your right arm straight up toward the ceiling.
-
Inhale, and as you exhale, slowly lean your upper body to the left or right, keeping your hips square and facing forward.
-
Feel the stretch along the right side of your body — from your shoulder down to your hip.
-
Hold for 2-10 seconds, then return to center.
-
Switch sides and repeat. Do this 3 times.
Stretch intentionally. Breathe deeply. Move fully.
Day 3: Seated Hamstring Stretch
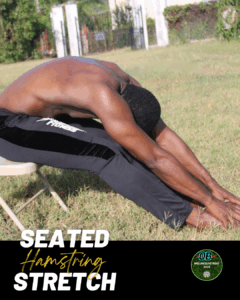
Primary Muscle Groups Stretched
Hamstrings
Secondary Muscle Groups Stretched
Calves, Glutes, and the Lower Back
🦵 The Neglected Hamstrings
Tight hamstrings are one of the most common issues we see — often caused by long hours of sitting, driving, or heavy leg training.
And guess what?
Tight hamstrings can lead to lower back pain, poor posture, and your restricted movement.
That’s why the Seated Hamstring Stretch deserves a spot in your daily routine. It’s easy, efficient, and incredibly effective.
🌟 2 Benefits of the Seated Hamstring Stretch
1. Improves Flexibility & Mobility-hamstrings, lower back & calves
Tight muscles restrict your movement, joint range of motion, and can reduce your workout performance. This stretch helps unlock fuller, pain-free range of motion in your back, hips & legs.
2. Supports Better Posture & Good Spinal Health
Tight hamstrings often pull on the lower back, causing misalignment. Regular stretching relieves pressure on your back, and keeps your posture in check.
🕒 2 Best Times to Do The Seated Hamstring Stretch
1. Post-Workout (Cool Down)
After heavy legs day (strength training), cardio (running, swimming), or even upper body training (compound/isolated movements).
2. Midday Break/After Workday Reset
Been sitting at your desk (work station) too long?
Been standing too long?
Or have you been busy with patients; or on the construction site?
All you need is max 10 seconds to do this stretch, release & reconnect with your body.
✅ Steps to Execute: Seated Hamstring Stretch
-
Sit on a chair with both legs extended straight out like the image above.
-
Inhale and sit up tall.
-
Exhale and slowly lean forward, reaching for your toes or shin, with your fingers.
-
Keep your back and neck relaxed.
-
Hold the stretch for 2-10 seconds of you’re a beginner, and short on time. If time permits, hold this stretch for 20–30 seconds, breathing deeply & in a relaxed manner. Repeat 3 times.
You’re strong. Let’s help you stay that way — long, lean, and injury-free.
Day 2: Standing Chest Stretch
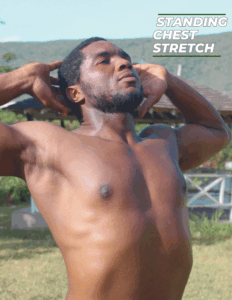
Primary Muscle Groups Stretched
Chest.
Secondary Muscle Groups Stretched
Abdominals, Diaphragm, Serratus Anterior, Intercostals
Benefits of this Stretch
*Increased chest expansion, supports easier breathing during stressful times.
* Maximizes stretching of both right & left sides of your chest, at once.
When You Should Do This Standing Chest Stretch
-After warm up (workout).
-When you experience soreness in the chest and/or abdominal muscles.
-After sitting at your desk (work station), typing on your laptop, phone or on a similar electronic device, for hour(s) at a time.
How Often Should You Do This Stretch
As often as needed.
Steps to Execute: Standing Chest Stretch
*Stand with feet shoulder width.
*Place hands on both sides of your head.
*Whilst standing with hands to the sides of your head, and your head slightly leaning back, take a deep breath, hold for 10 seconds & look up.
Day 1: Standing Inner Thighs Stretch (Chair-Supported)

Primary Muscle Groups Stretched
Inner Thighs.
Secondary Muscle Groups Stretched
Hamstrings. Hip Flexors.
Purpose & Benefit of Holding the Chair
*Minimizes risk of stretching beyond ‘safe range of motion’. This is applicable for seniors and exercise-beginners.
*Shows applicability of doing this stretch within environments such as: home, work, hotel & conferences.
When You Should Do This Chair Supported, Inner Thighs Stretch
- After a long (relative) meeting, in a sitting or standing position.
- If you’re experiencing tightness in your inner thighs, when you walk, and/or run.
- After a dosage of exercise.
How Often Should You Do This Stretch
-After warm up (workout).
-After 1+ hours sitting.
Steps to Execute: Standing Inner Thigh Stretch (Chair Supported)
- Stand with feet together behind chair.
- Place hands on the chair (neck, back).
- Whilst standing, Slowly space your feet apart, until you begin to feel stretching/tension, primarily in your inner thighs region.
- Hold the position of inner thighs tension, for 2-30 seconds.